

A native, open-source RAW photo editor for Mac, iPad, and iPhone that anyone who knows Lightroom will find familiar.





Redlamp is built from scratch in Swift and Metal for Apple Silicon. It focuses on one thing, developing photos, and aims to do it faster and more natively than anything else on the platform.
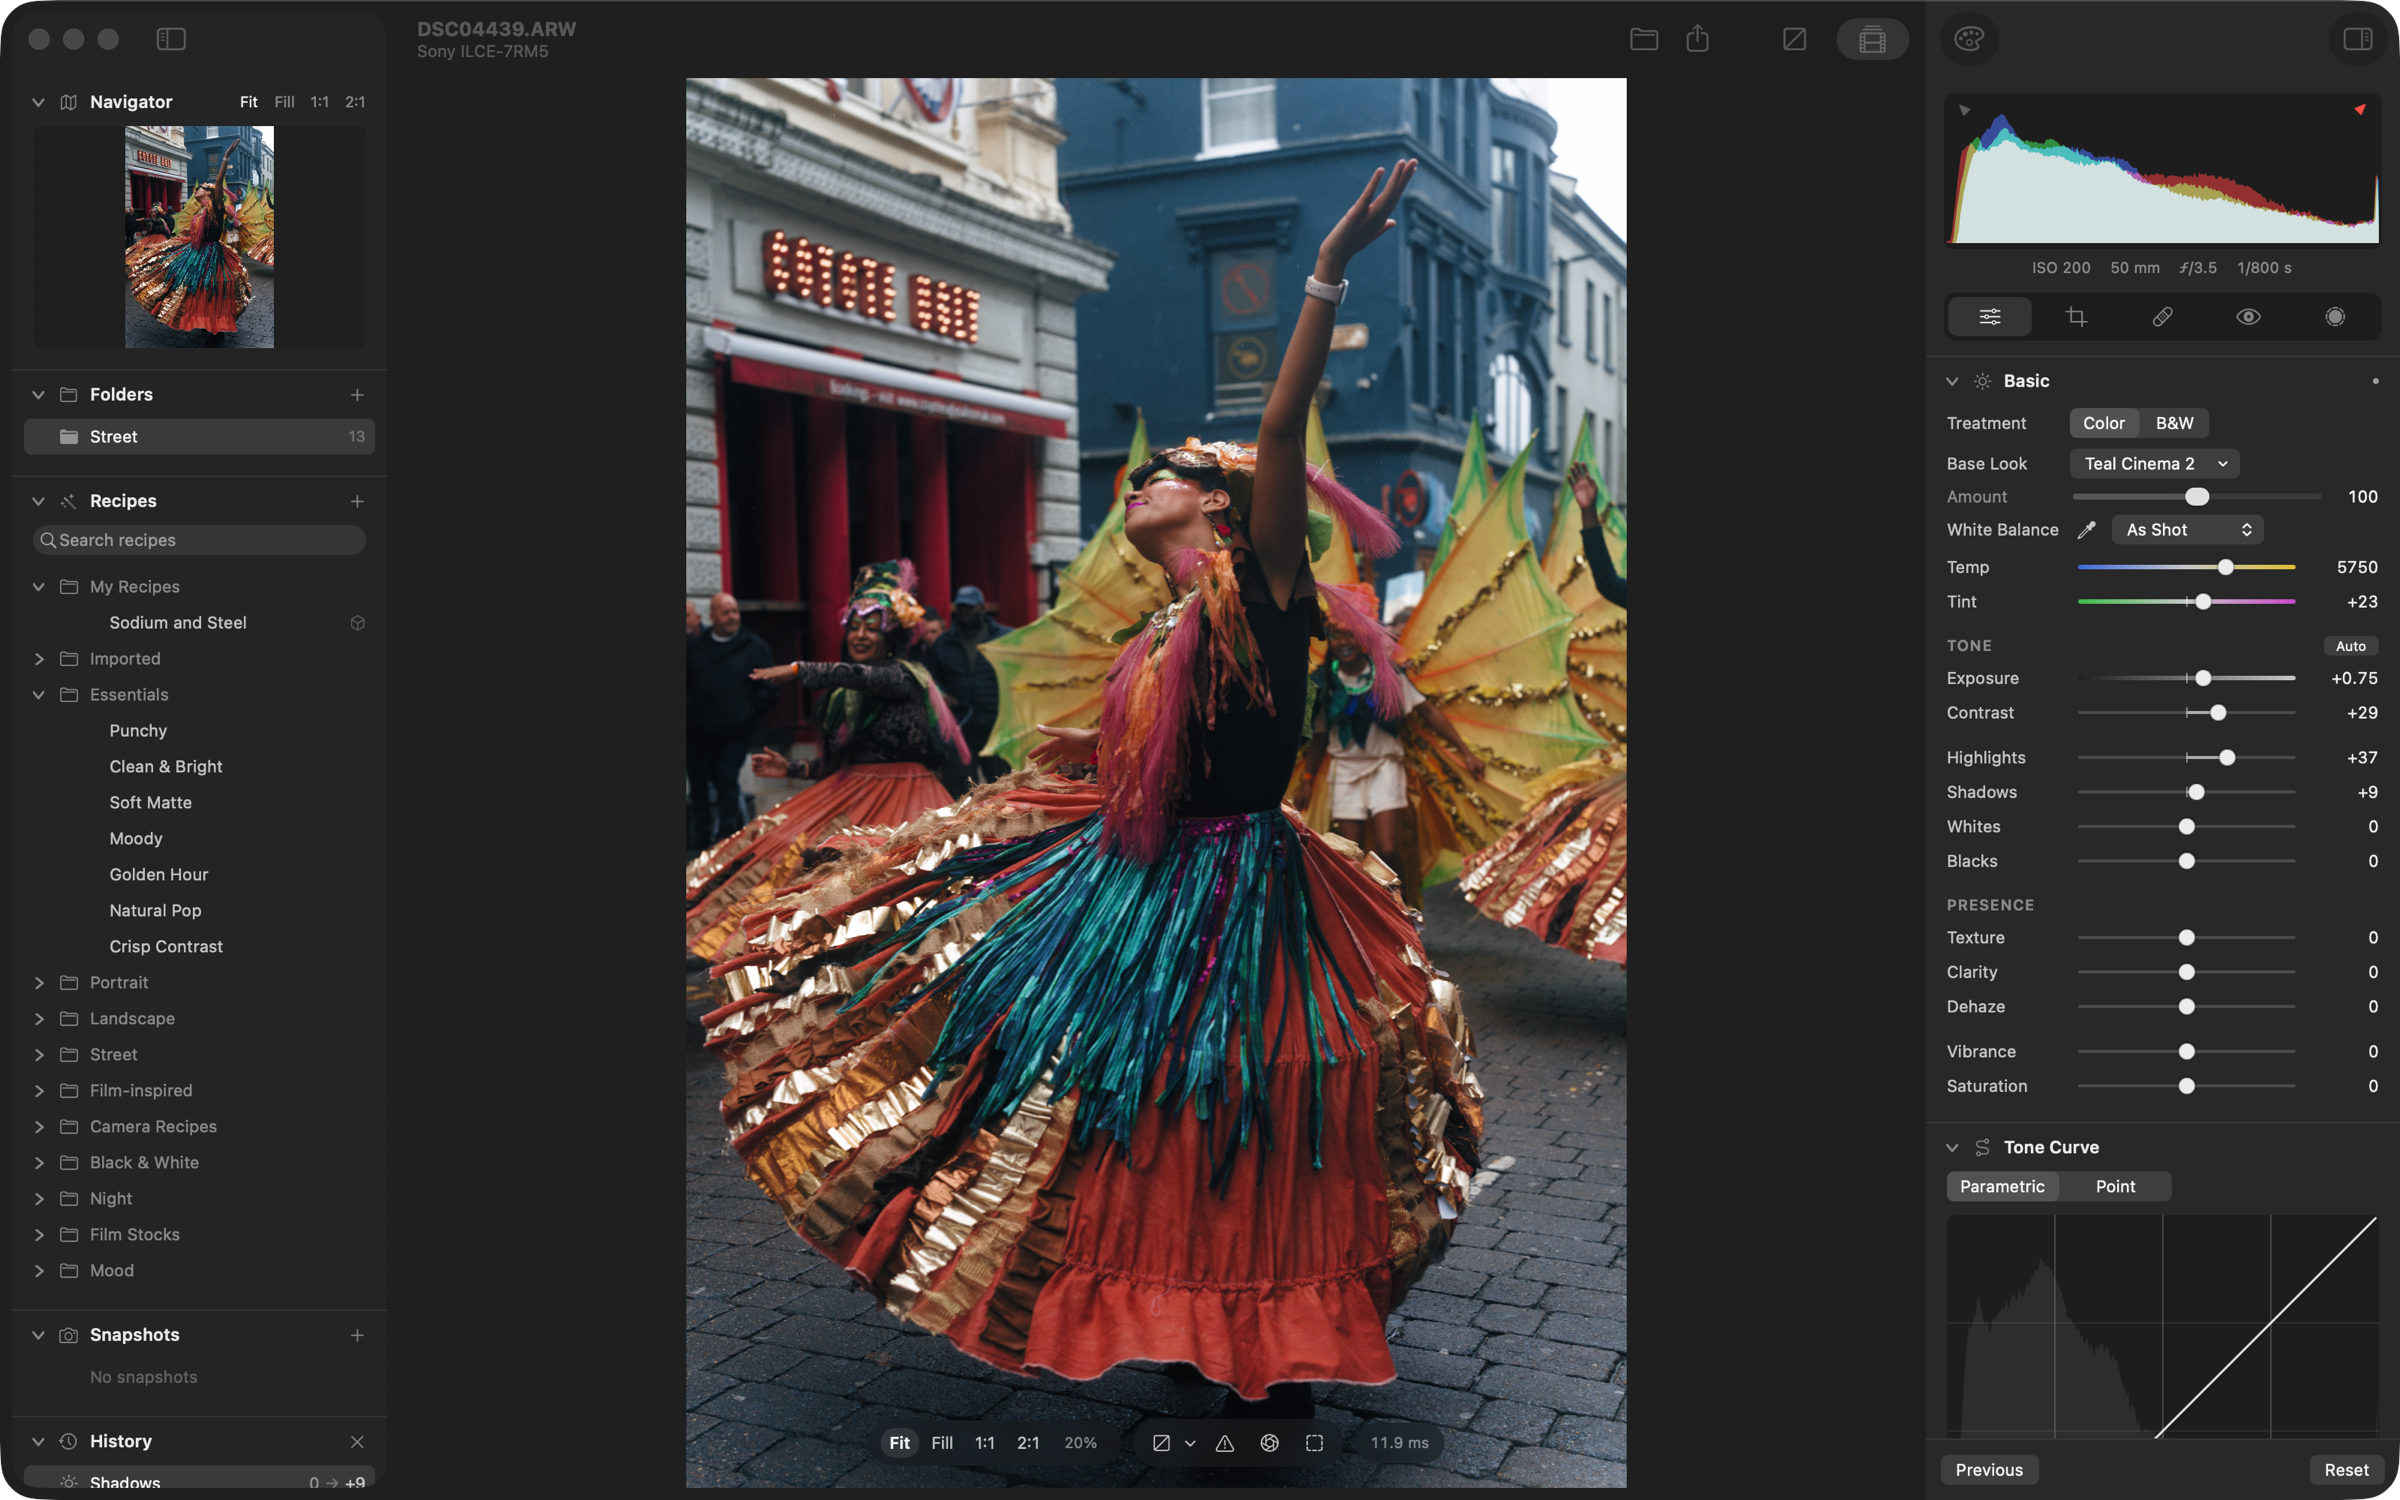
Watch the film: Introducing Redlamp (1:42, on YouTube)
Status: alpha, iteration 2 (macOS). The core RAW pipeline and the Develop workspace work today: Basic (with Texture, Clarity and Dehaze), Tone Curve, Color Mixer, Color Grading, Detail (noise reduction and sharpening), Effects, lens corrections, crop and Upright, masking (gradients, brush, color and luminance range, Subject, Sky, Background, People and its parts, Objects, Landscape and Depth Range) with local adjustments, healing and removal (Heal, Clone, Remove, content-aware or generative, and Remove Dust), focus stacking, and Base Looks and Recipes, Redlamp's profiles and presets, with film looks measured from cameras' own renderings and film simulations of 36 film looks from 30 stocks, built from the manufacturers' datasheets. AI Denoise and the rest of Develop parity are next, then 1.0 and the iPad and iPhone apps. See Where we are, the Roadmap, and how Redlamp compares with Lightroom.
This README is the project's primary status page and is kept up to date as work lands. Last updated: 4 October 2026.
Contents
- Why Redlamp
- Goals
- Where we are
- Film simulations
- Screenshots
- Roadmap
- Installation
- Getting started
- Component harness
- Using Redlamp
- Architecture
- Contributing
- Support Redlamp
- License and acknowledgements
Why Redlamp
A red lamp is the darkroom safelight: the one light you can work by without fogging the paper. That is the idea behind the project: you can see and shape your photo freely, and the original is never harmed.
Lightroom defined how millions of photographers edit, but it is a cross-platform application that doesn't feel at home on a Mac, iPad, or iPhone, and it is tied to a subscription and a cloud. Redlamp keeps the workflow photographers already know, including the panel layout, slider names and ranges, and keyboard shortcuts, and rebuilds everything underneath as a native, GPU-first, open-source application.
Redlamp works on your folders. It keeps a working set of folders, as Lightroom Classic's Folders panel does, and stores edits in small sidecar files next to the photos. A library built the same way is planned for 1.0 (roadmap): folders on your disk stay the organisation, ratings, keywords and collections are saved with each photo, and an index on your Mac, there only for speed, is designed for libraries of a million photos.
Goals
- Immediately familiar to Lightroom users. The Develop module's layout, panel order, slider names, ranges and defaults, and single-key shortcuts all carry over. We copy conventions, never Adobe's assets. Profiles and presets are kept apart, as in Lightroom, under Redlamp's own names: a profile, film stock or LUT is a Base Look, and a preset is a Recipe, which can set a Base Look as a preset can include a profile. Base Looks have a panel of their own, before Recipes in the left column, because a photographer chooses the look first and edits from there. Lightroom's words still work as tooltips and in search.
- Best-in-class masks. Masks are part of the architecture from day one. Every edit is a layer (adjustments plus a mask), with Lightroom's model of components combined by add, subtract, and intersect, and on-device AI masks built on Apple Vision and SAM-class models.
- Modern, native UI and great UX. The UI follows the macOS and iOS 26 design language. Liquid Glass is used only on floating chrome, and editing surfaces stay neutral grey so nothing distorts your color judgment. It is direct-manipulation first, every action can be undone, and there are no modal dialogs while you edit.
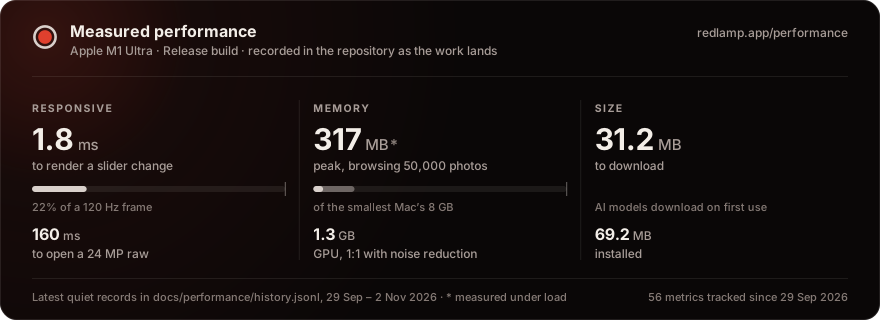
- Extreme responsiveness. Rendering and UI are strictly separated. Slider changes should reach the screen within a frame (under 16 ms), and the UI thread never waits on the engine, the disk, or the GPU.
- Serious color science. The pipeline is linear and scene-referred up to the tone curve: white balance, exposure, tone, Dehaze and the detail stage, and their masked versions, work on the light the camera recorded, and the color controls, the point curve, vignette and grain work on the tone-mapped image after it (the pipeline). It uses the camera profiles DNG files embed, and has LUTs, lens profiles, and our own looks. Some looks are fitted by measurement to cameras' own renderings.
- Computational photography built into the editing workflow.
- Best-in-class denoise: a classical, noise-profiled denoiser plus an on-device AI denoiser that runs directly on raw data.
- Focus stacking in one click, from detecting a bracketed sequence to an editable result, with pro-level strategies and retouching. This is something Lightroom doesn't offer at all, and dedicated tools only offer with a lot of friction.
- AI where it clearly wins: masks, removal and upscaling, running on the device with no cloud and no credits.
- Mac first, then iPad and iPhone from the same engine. A single platform-neutral engine sits under thin, native shells. The Mac editor comes first; iPad and iPhone follow once the main features are complete, and edits will move between devices through iCloud Drive, Files, and Photos.
- Open source (MPL-2.0). The license is compatible with the App Store. Algorithms are implemented clean-room from papers and specifications.
Where we are
What works today (macOS)
RAW pipeline (our own, GPU-first)
- Decodes RAW files through LibRaw (unpacking only). Black levels, white balance, demosaicing, and color are all done by Redlamp on the GPU.
- Bayer demosaic by directional filtering with a posteriori decision (Menon, Andriani and Calvagno, 2007), with a dual pass that takes plain green where the neighbours differ only by noise, Markesteijn's X-Trans demosaic (ported from LibRaw under its CDDL licence), and linear DNG support (for example iPhone ProRAW).
- Hot pixels are repaired before demosaicing, judged against each photo's own noise level.
- Row and column banding is measured in the sensor's masked (optical-black) margins and subtracted with the black level, only where the margins show more than their own noise.
- DNG gain maps (OpcodeList2), such as phones' lens shading correction, are applied before demosaicing, and noise reduction scales with the noise they amplify.
- Highlight reconstruction: channels are no longer clipped at 1 after white balance, and photosites that did clip are rebuilt from their bright unclipped neighbours, using the colour measured around the clipped area. Fully blown areas stay neutral. From process version 15, highlights clipped in one or two colours keep the colour of what's around them when Highlights or Exposure pull them below white, so a clipped sky stays blue instead of turning lilac, and areas clipped in every colour fade smoothly to neutral.
- Each camera's brightness: for new edits (process version 16), a raw opens about as bright as its camera's own JPEG, from a table of 576 cameras Redlamp measures from the camera bench's CC0 files, never from Adobe's data; a camera it lacks gets its maker's value, and a calibration from a target takes its place. Held out, every maker's photos open within a tenth of a stop of their JPEGs in the median, where Redlamp's default ran up to 0.6 stops darker (CAM-29).
- Tested on Sony ARW, Canon CR3, Nikon NEF, Fujifilm RAF (X-Trans), Apple ProRAW DNG and Google Pixel DNG, plus JPEG, HEIC, TIFF, and PNG.
- The demosaiced image is cached as a full mip pyramid, so interactive renders sample the right resolution for the zoom level.
- A single fused Metal kernel applies every per-pixel adjustment. Frames are delivered as IOSurfaces, so pixels are never copied between engine and UI.
- Latest-wins render scheduling: a burst of slider events collapses to the newest one. Stills wait in two lanes, previews (look thumbnails) ahead of exports, and yield to the canvas between tiles, so an export never holds up a frame by more than a tile; a cancelled still stops at its next tile, and exports rest between tiles when the Mac runs hot.
- Rendering stays off the main thread while you drag a slider. Frames go straight to the canvas, which a dedicated display-link thread presents, and each view observes only the values it shows.
- Both side panels are AppKit: the histogram, tool strip and every Develop and Masking panel on the right, and the Navigator, Folders, Base Looks, Recipes, Snapshots and History on the left, built from the same panel component. The right column's panels match their SwiftUI originals pixel for pixel, and a component harness is used to build and review them (see Component harness).
- Temperature and tint use a proper camera white-balance model (Robertson's method with the camera's color matrix). As Shot, Auto, and the illuminant presets all work.
Develop adjustments that render
- White balance: Temp and Tint, the presets, Auto, and the eyedropper.
- Basic: Exposure, Contrast, Highlights, Shadows, Whites, Blacks, Vibrance, and Saturation, plus the Auto button.
- Treatment (Color or B&W) and Base Looks (Lightroom's profiles) with an Amount slider (0–200) and a browser that renders every look on the photo. There are six built-in looks (Redlamp Color, Neutral, Vivid, Landscape, Portrait and Monochrome) and 15 film-style looks built on 3D look tables: slide, chrome, negative, cinema, bleach and black and white through color filters. Four of them are measured from cameras' own renderings by the look profiler (see Recipes and looks). The Base Look menu lists these, Redlamp Reproduction and a photo's own camera look, and for a raw, the photographer's own Adobe camera profiles for its camera, read where Lightroom Classic or Camera Raw installs them or from files they choose and used on that Mac only (TON-51, TON-52); it shows a film look or an imported LUT first only while it's the photo's look (DEC-74). Every look, film stock and LUT is listed in the Base Looks panel, before Recipes in the left column, in folders (Favorites, In This Photo, the photo's camera profiles, Redlamp, Film Styles, Film Stocks, Fujifilm LUTs, Imported and Reproduction) and with its own search, which reads names, summaries, makers and kinds: hover a look to preview it, click it to apply it, and the photo's look is highlighted in its folder. Its + menu imports a LUT, chooses camera profiles or opens Fujifilm's LUT page. Right-click an imported look for Show in Finder and Move to Trash, or an installed look no recipe uses for Remove from Base Looks; a look moved to the Trash or removed is listed nowhere afterwards, and the photos that use it keep rendering with it. Right-click a built-in folder (Adobe Raw, Camera Matching, Creative, Redlamp, Film Styles, Film Stocks, Firmware Model or Reproduction) to hide it from the panel, its search and ⌘K, as in Hide “Film Stocks”; the panel header's right-click menu shows it again (UX-55). Wherever a look is chosen, a film stock brings its own grain, halation and bloom, and B&W for a monochrome stock, and leaves every other setting as it was; a look that isn't a film stock, chosen in place of one, takes the film's grain, halation and bloom away, and a colour look chosen in place of a monochrome one sets Color (UX-54).
- Tone Curve: a parametric curve with split points, and a point curve with presets, for all three channels together or for red, green and blue on their own.
- Color Mixer: HSL (Hue, Saturation, Luminance, and All) and a per-color mode, working in OKLCh.
- Color Grading: 3-way and individual wheels, Blending, and Balance. It also tints B&W images for split-toning.
- Effects: post-crop vignette (amount, midpoint, roundness, feather, and Highlights to keep bright areas bright under a darkening vignette) and zoom-stable film grain.
- Noise reduction (Detail panel): Luminance with Detail and Contrast, and Color with Detail and Smoothness. It is scaled to each photo's own noise: the DNG NoiseProfile tag, else its camera's calibrated profile at its ISO, else measured from the raw data when the file opens (a raw far cleaner than its camera's profile has had noise reduction in camera, so the measurement wins). Luminance keeps fine texture: wavelet shrinkage judges each detail by its neighbourhood, and at 1:1 and in exports a non-local-means pass guided by that result brings back texture where the photo repeats it. It runs as a cached stage in front of the fused kernel, so other sliders stay as fast as before, and exports render in tiles. For new edits (process version 16), values below black are kept from the raw data until after it, so the noise in the deepest shadows averages to their true level: at very high ISO they no longer lift and turn magenta (DN-12).
- Sharpening (Detail panel): Amount, Radius, Detail and Masking, in the same cached stage after noise reduction. It is noise-aware: detail is measured on a denoised copy of the luminance and applied to the untouched image, so the photo's noise and grain pass through as they were instead of being sharpened. Detail moves from a halo-limited unsharp mask towards Richardson–Lucy deconvolution of the Radius's blur, and holds back halos on strong edges; Masking keeps flat areas untouched. It boosts luminance detail in stops, so it doesn't depend on exposure and leaves colors alone.
- Texture and Clarity (global): gains on medium (about 2–8 px) and larger (about 8–64 px) luminance detail, taken from the image pyramid in the same cached stage, so tiles and zoom levels agree. Negative values soften. For new edits (process version 9) Clarity is edge-aware: a strong edge isn't its detail, so it puts no bright and dark bands along a skyline or around a tree. From process 11, Texture, Clarity and sharpening read one decomposition of the noise-reduced photo: Texture keeps its strength on texture but no longer outlines strong edges, adds less noise, and matches a downscaled export at every preview size, and dragging Texture, Clarity, Amount, Detail or Masking takes a fraction of a millisecond at 1:1.
- Dehaze (global and in masks): the dark channel prior (He, Sun and Tang, 2009) with the airlight and a haze map measured when the photo opens; negative values add a veil. For new edits (process version 8) the haze map follows the photo's edges, so the sky beside a tree or a ridge has no pale glow. From process version 18, negative values add haze where the haze map finds it, toward a slightly cool veil, so the distance and bright, unsaturated areas fog over while nearby dark, saturated things keep their contrast (TON-55).
Masking (Lightroom's model)
- Each mask is a layer: its own adjustments plus a mask built from components. Components combine with Add, Subtract, and Intersect, and each can be inverted, as can the whole mask (Invert, as Lightroom's).
- Linear and radial gradient components.
- Draw them on the photo.
- Drag the handles to move, resize, and rotate; radial gradients also have a Feather control.
- Pins select the other masks.
- Brush (
K): A and B brushes and Erase (hold Option), with Size, Feather, Flow, Density and Auto Mask, and pen pressure. Strokes are kept as vectors in the edit and painted on the GPU in mask space (up to 4096 px), redrawing only the stroke being painted.[and]or ⌘-scroll change the size, with Shift the feather; the brush's ring shows its size as it changes, also from the panel's sliders, and Space-drag moves the photo while you paint. In every tool the wheel and pinch zoom. - Luminance Range (
⇧Q) and Color Range (⇧J): sample with the eyedropper, then shape the range with four handles (Show Luminance Map) or Refine up to five color samples. They select on the photo with its global edit, so the selection follows white balance and exposure. - AI masks: Subject, Background and People (each person, or parts: face skin, eyebrows, eye sclera, iris, lips, teeth, and hair from iPhone mattes), with Apple Vision's built-in models and nothing to download. Objects: hover to preview, then click, drag a