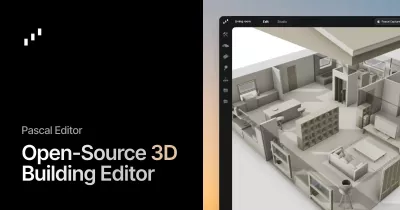

An open-source floor planner for the browser, with a 3D view. Walls, doors, windows, furniture and IT and security equipment, multiple floors, true-to-scale measurement, an axonometric view, and a 3D view you can orbit, walk through in first person, and export. Use it on its own, or embed it in your own application.
Project site: axonometra.com
Status
Pre-1.0 (currently v0.5). The embedding API and the plan format can still change between minor versions; each change is recorded in CHANGELOG.md.
Features
- Plan editing. Walls, doors and windows, rooms and multiple floors, drawn to a 10 cm grid and measured true to scale.
- Around 260 items in 13 groups: living, bedroom, dining, kitchen, bathroom and laundry, office, comms and server room, networking and AV, security, fire and safety, outdoor, vehicles and EV charging, and structure.
- Axonometric view of the plan.
- 3D view. Orbit, or walk through in first person with collision and storey
changes. Save an image, or export the whole building as a
.glb(glTF) file for Blender and other 3D tools. - Embeddable. A React component,
@axonometra/editor, or an iframe andpostMessagecontract; see EMBEDDING.md. - Keyboard accessible. The toolbar and the canvas can both be driven from the keyboard (see below).
Getting started
git clone https://github.com/qant-au/axonometra.git
cd axonometra
npm install
npm run dev
In your own React app
npm install @axonometra/editor react react-dom @mui/material @emotion/react @emotion/styled
import { Axonometra } from '@axonometra/editor';

export function Planner() {
  return (
    <div style={{ height: 600 }}>
      <Axonometra onSave={(scene) => save(scene)} />
    </div>
  );
}
The editor fills the box you give it, and several can share a page. React, MUI and Emotion are peer dependencies, so your app provides one copy of each. The props, the ref API and the iframe alternative are in EMBEDDING.md. Plans are saved as scenes. Files in the plan format Axonometra used before (PLAN-FORMAT.md) still open, and save as scenes.
Using it
Saving and loading
- Ctrl+S (Cmd+S on macOS) saves the current plan to your browser's local storage
(in the app; a host app decides with
onSave). - The toolbar Save button downloads the plan as an
axonometra-plan-*.jsonfile, an Axonometra scene. A scene opened from a file keeps everything Axonometra does not draw (other views, object properties and connections) when it is saved again. - Load a plan from the welcome dialog ("Load from disk" / "Load from local save") or the toolbar's Load plan button. A scene or an old plan file both open; only scenes are saved.
- Saving is manual; there is no periodic autosave.
Floor and ceiling
Ceiling items, such as downlights, smoke detectors and ceiling access points, are
drawn lighter on the plan. The toolbar's Floor and ceiling menu shows both, the
floor items only, or the ceiling items only (a reflected ceiling plan), and turns on
Height tags: C beside an item flush with the ceiling, C -300 mm for one
hanging below it, +1100 mm for one raised off the floor. Where items overlap, click
the selected one again to select the one underneath. The Axonometric view draws
ceiling items over the furniture, with Hide ceiling items to see the room below.
Wall height... on the same menu (or the right-click menu on an empty part of the plan) sets the current floor's height, floor to ceiling, as one undo step. Ceiling items keep their gap below the ceiling and move with it, and so does anything standing on them.
Items on top of other items
Drop or move a monitor, laptop, desk phone, router, NAS or microwave over a desk,
table, bench, base cabinet, sideboard, TV unit or bedside table and it stands on
its top, in every view, and goes up or down with it when the support's height
changes. Anything else can be stood on the item under it from Height and
mounting... (Mounted on: Another item). Moving a support does not carry what
stands on it: an item left behind, or on a support that is deleted, drops to the
floor and a notice says so. The scene file records the support (mountFrom: 'surface' with mountOn).
3D view
The toolbar's 3D view button shows the plan as a 3D model: walls with their door
and window openings, a floor and ceiling for each room, and furniture drawn from each
item's 3D model. Drag to turn it, right-drag or use the arrow keys to move, and scroll
to zoom. In Walk, W A S D or the arrow keys move and Q and E turn. Walk switches to a first-person view; with reduced motion turned on it
moves by teleporting instead. Cut away walls (on by default) cuts the walls off at
1.2 m so you can see into the rooms; Show ceiling items (on by default) draws what
hangs above the cut, such as downlights, ceiling cameras and a wall TV's top half, as faint
outlines at its true height. All floors stacks every floor, Save image
downloads a PNG, and Save 3D model downloads the building as a .glb file. It needs
WebGL, and three.js is only downloaded the first time the view is opened.
Undo and redo
- Ctrl+Z (Cmd+Z on macOS) undoes the last edit; Ctrl+Shift+Z or Ctrl+Y redoes it. The toolbar has Undo and Redo buttons too.
- One step is one canvas click or drag (a wall segment, a moved node, a placed or resized piece of furniture), or one toolbar edit.
- History holds the last 100 steps and is cleared when a plan is loaded.
Shortcuts
Axonometra's keymap is aligned with Excalidraw: someone coming from Excalidraw should not have to retrain. Press ? (or the toolbar's Keyboard shortcuts button) for the full list and every deliberate difference from Excalidraw. The specification is docs/keymap.md.
| Key or gesture | Does |
|---|---|
| V or 1 | Select (the Edit tool) |
| H | Hand: pan |
| L or 6 | Wall |
| W, D | Window, door |
| M | Measure |
| E or 0 | Erase |
| Click, Shift + click, drag on empty plan | Select, add to the selection, select an area |
| Ctrl/Cmd + A | Select everything on the floor |
| Delete or Backspace | Delete the selection |
| Arrow keys (Shift for 1 m) | Nudge the selection 10 cm |
| Ctrl/Cmd + C, X, V, D | Copy, cut, paste, duplicate |
| Alt + drag | Drag a copy, leaving the original |
| Enter, or Ctrl/Cmd + Enter | Type the selected wall's length |
| Ctrl/Cmd + F | Find an item on any floor |
| Mouse wheel; Shift + wheel | Pan; pan sideways |
| Ctrl/Cmd + wheel, pinch | Zoom |
| Space + drag, or right-drag | Pan, from any tool |
| Ctrl/Cmd + = / - / 0 | Zoom in, out, reset |
| Shift + 1, Shift + 2 | Fit everything, fit the selection |
| Alt + Shift + D | Light or dark |
| Right-click | Menu: copy, delete, turn, edit length, exterior/interior |
| Esc | Deselect, or end wall drawing |
A door or window is copied with its wall. Grouping, draw order, align and lock are not built yet, so their keys are unbound.
Keyboard cursor
The toolbar is keyboard-operable: buttons are reachable by Tab, expose accessible labels, and show a visible focus ring.
The canvas can be edited from the keyboard too. Tab to it (it is announced as the "Floor plan" application) and a cursor appears on the plan:
| Key | Does |
|---|---|
| Arrow keys | Move the cursor 10 cm (one grid cell) |
| Shift + arrow keys | Move the cursor 1 m |
| Enter or Space | Use the selected tool at the cursor: place a wall point, delete what is there, or add a door or window to a wall |
| Enter or Space in Edit mode | Pick up the wall point, wall or piece of furniture under the cursor; arrows move it, Enter puts it down |
| Ctrl/Cmd + Enter in Edit mode | Type the length of the wall under the cursor |
| Escape | Cancel a move, or end wall drawing |
| Ctrl/Cmd + Z | Undo |
The cursor takes the arrow keys and Enter while the canvas is reached from the keyboard; after a mouse press they go back to the selection.
Every action is announced through a polite live region, including refusals such as deleting a wall point that still has walls attached. Doors and windows move with their wall and cannot be picked up on their own. Resizing and rotating furniture still needs the pointer.
Contributing
Issues and pull requests are welcome.
- Found a bug, or have an idea or a question? Open an issue. For anything substantial, open the issue before writing code so we can agree on the scope.
- Sending a pull request? Read CONTRIBUTING.md for setup, checks and conventions.
- Found a security problem? Report it privately, as described in SECURITY.md.
Everyone taking part is expected to follow the Code of Conduct.
Author
Created and maintained by Adam Burgess (adamburgess.me). Adam is available for customer implementation work through QANT Pty Ltd.
Origins and license
Axonometra started as a fork of Arcada, written by
Nicoleta Mehanix as a Bachelor's thesis project. It is dual-licensed MIT AND Apache-2.0: code that originated in Arcada stays under the
Apache License 2.0, reproduced verbatim with its copyright notice, and
Axonometra's own changes are under the MIT License. LICENSE
explains how the two apply.